
Morris, Wolseley and MG saloon cars, up until and including the Y Type, had the Jackall integrated jacking system fitted. It was an optional extra on the Morris, but standard on the Wolseley and MG. As Lord Nuffield owned the Jackall firm, as well as the three car companies, this is not really surprising. Today it is rarely seen as many previous owners of the cars have removed the entire system as spares were non-existent until recently. Today you can find the seals and rams on the MG Y Register website shop, NTG and the MG Octagon Car Clubs site.

Pump as it is fitted to the car.
For the jacks, and a description of the system, there are other articles on the MGCC Y Register website (under Technical) pages to assist you. This is just about the pump itself. The pump is a MAZAK die-casting bolted to the nearside (UK) of the dash/firewall of the engine bay. It has a feed pipe from a reservoir bolted to the front of the battery box, and two feed pipes running from underneath to the front pair and rear pair of jacks. The threads on the brass unions that hold the pipes to the jack, using an olive, is very fine so take care not to over-tighten them. Because the pump will have leaked over its long life, it may well look in very good condition, but its seals will be worn and require renewing and it is likely the cotter-pin that secures the handle will have worn, or conversely seized in solid Place some old cardboard or old towel underneath the car where you are working to catch escaping oil and dropped nuts.
Remove the feed pipe from the pump and the reservoir and catch the oil. It’s worth removing the reservoir anyway and clean out inside as there will be years of gunge at the bottom, use petrol for this. The oil in the Jackall system is a 20sae mineral oil, you can use engine oil but it will ‘foam’ when the system is released, so use motorcycle fork oil. Remove the two smaller pipes from underneath the pump, taking care to hold the brass union adaptor (the bigger of the two hexagons) with another spanner

Pump removed ready to be cleaned.
or it will try to undo as well. As you unscrew these olive-type unions be aware that you must gently pull the pipe out as the threads are run down, or the union will ‘bind’ on the pipe and be a real pain on re-fitting. Put some old cardboard or newspaper underneath if you do not want oil stains on your floor. Undo the two bolts that hold the pump to the dash. Lift it away and clean it in a suitable container. Take this opportunity to clean up the dash as well.
Now take it to the bench and remove the four set-screws on the front face. Inside you

Front cover removed and gauze filter shown.
will find a gasket and a brass gauze filter in the cover. Carefully lift out the filter and wash it in petrol. Clean out all the muck under it and in the body. If the gasket looks OK add a bit of gasket-goo and refit the cover; there is no need to remove anything else here. If the gasket was damaged you will have to make a new one (hints on the website Tech pages somewhere). Put the pump in the vice (holding it across one of the bolt flanges) and remove the handle’s cotter-pin; the handle should come off then. Examine the cotter, it will probably be well worn and you may need to make a new one. There is a MAZAK collar

Collar being removed from the shaft.
under the pump handle that needs removing as there is a rubber seal behind it you need to renew. This collar may well ‘bind’ on the flats of the shaft
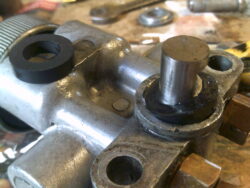
Old seal about to come out, new one waiting.
where the cotter pin lives. I had to use a small puller to get it off (the handle shaft is tempered steel and very hard, you will not be able to file it). Using a scribe or other pointed tool to prize out the old seal. Clean the hole up, lubricate the new seal and press it in. It is a very tight fit. Refit that washer which will stand proud a bit. Use a socket to press it into the seal. Now refit the handle, having probably had to make a new cotter-pin.
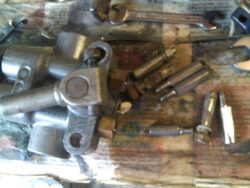
Cotter pin being removed, selection proved of no use.
If you do make one, only file a tiny ‘flat’ on it and make it too long at first (the one in the photo has a split-pin hole in it, ignore this as that bit was cut off). Fit it loose and work out where to cut it shorter so it will not cause the handle to hit the bolts that hold the pump to the dash. When fitted one end should be almost flush, the other just long enough to be

Under the selector.
flush with the nut threads.
Now remove the black knob from the selector, you just need to unscrew it, its shaft is quite long and the end tapered

With the caps removed.
where it closes off the oil feeds. The round ‘selector’ (the thing with the ‘Front’, ‘Rear’ ‘All’, on it) has two locking nuts holding it on. You’ll need a thin cycle spanner (the ones you got with your new bike when a teenager) to hold the lower nut, the upper one a normal open-spanner (all nuts are BSF/BSW, but NOT the threads). Between the two nuts is a pointer that will come loose. Do not worry I’ll tell you how it fixes back. CAREFULLY remove the selector noting where the big, thick curved washer with a slotted hole in it lives, which way up it goes and that there is a spring under it. Note carefully how this all came to bits. Underneath you will find two small shafts poking up, a small plate with a cheese headed screw in it, and the black knobs tubular housing. Clean it all up first. Pull the little shafts out and put them somewhere safe (I use old ice-cream plastic cartons for my bits when stripping anything).

New seals required, plus a shaft seal
Remove the cheese headed screw, note which way up the plate lives, and then undo the black knob’s tubular housing (it just unscrews). Under it in a deep hole you will see a red seal. Now using a pair of circlip pliers undo the two slotted things each side (or two 4” nails, they are not very tight; see photo). Remove them and

Cotter pin being removed, selection proved of no use.
you will see two more red seals. Now you can lever out all three red seals, and after giving the three new ones, two big and one smaller, a good soaking in oil, fit them the correct way round (not upside down). You will need to use a clean socket spanner to press them all home. Re-fit the two little shafts which you will find are a very tight fit indeed in the new seals. Re-fit the black knobs tubular housing, it screws back in until tight.
Now re-fit the little plate that the cheese-headed set-screw holds on. Then place

Pump re-fitted and ready to bleed.
the spring on with the thick curved washer under the round selector (front-rear-all) making sure you line up the hole in it with the hole through to the bleed-screw. Hopefully you took note of how the thick-curved washer fitted or the selector will not sit down properly, its slot lined up with the bleed screw access hole.. You may need to try a few times. Once it sits firmly on the spring and thick washer screw on one of the lock-nuts. Screw it down until you cannot move the selector, now back off till you can (lining up the ‘All’ with the outer-pointer on that plate underneath that the cheese-headed screw secures.). Fit the pointer and the other locking nut. Hold the lower one with the thin cycle spanner whilst tightening up the top one, with the pointer lined up with ‘All’ and the outer pointer. Try moving the selector to each side. If it will not go, loosen off the locking nuts a bit until it ‘selects’ the ‘Front’ and ‘Rear’ easily. You will feel the big thick washer underneath locating those two little shafts and closing their

Close up of the bleed-screw.
valves. Re-lock the two locking nuts. Refit the black knob and its shaft, screwing it right down. This is what releases or permits the jacks to operate. Now you can refit the pump to the car.
Take very great care to correctly line-up the pipe unions with their respective threaded holes. Get this wrong and you’ll strip the threads and have awful leaks. Once you have carefully re-connected up all three pipes (and re-fitted the oil tank after cleaning it out) half fill the tank. Now undo the bleed-screw (see photo) and pump way until you get oil oozing from its bleed hole. You will need to have the selector knob on ‘All’ and the black knob loose (released). You may need to try for a while until the oil is coming though. Once you’ve bled the pump, tighten that screw and pump up the jacks. Check for and leaks and tighten any unions as required. Now you can fill up the oil tank after you have wiped up all the spilt oil from the engine bay and chassis and crankcase. Use mineral oil and not brake/clutch fluid as this will rot the seals (it’s a vegetable based oil).
NC.